Whew! Creating a tutorial is a lot of work, you guys! So many photos! It’s fun, and certainly challenging for me. I’ve tried to cover everything as thoroughly as I can, but do please let me know if you need me to elaborate on anything, and I will go back and insert it in this post. Maybe make a Q&A addendum.
Here goes!
A note about pattern sizing…
Hopefully if you are reading this, you have already gathered up your supplies as listed here. We will be using McCalls M6893 to create pattern pieces for our copycat look of the Barcelona Balcony dress. If you have sewn from a commercial pattern before, you probably know this already, but I feel like I should say it anyway. Pattern sizes DO NOT correlate to ready-to-wear sizing!!!! This means if you are a size 6 when you buy a dress at the mall, you are not a size 6 in a sewing pattern. You are probably an 8, or a 10. And if you are using a vintage pattern, heaven help you, because you are probably a 12 or even higher. Really old vintage patterns (we’re talking 1900’s) actually based pattern size on age. In this case a size “12”, was “Size 12 years”. Interesting, huh? (The following image is of a vintage pattern that can be purchased through Etsy, here.)

My point being, I find it best to ignore the pattern sizes, and just take your own measurements and write them down. With your measurements at hand, determine on a pattern by pattern basis what your “size” is by checking the handy little chart on the back of the pattern envelope, or on the envelope flap. This will save you a lot of aggravation. If you are plus size, like me, it is likely that this particular pattern is not available in your size, but do not fear! I will be showing you how to size it up in this post. Commence happy dance.
McCalls M6893
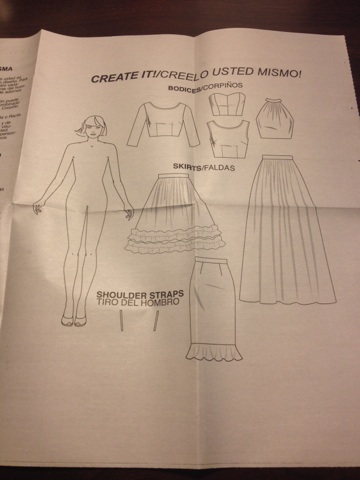
The first thing I noticed when I opened my pattern envelope was this neat little “Create It” page. I love anything in this world that has the same premise as a paper doll (hence my addiction to the Covet Fashion game on my iPhone, and no, they did not pay me to say that. I think I only have twenty readers, lol.) The idea is that you can mix and match skirts and bodices included in this pattern to create your own dress design. I’ve noticed the Project Runway series of patterns do this as well. I’m guessing this is something they train you to do in Fashion Design school. I could create an entire post about “Fashion Croquis”, so I’ll try to get back on track.
Cut out the following pieces according to your size: 1, 2, 8 (for reference only), 12, 13, 18
This tutorial will begin with the bodice, so you will only be using pieces 1 and 2 for right now. Put the others in safe place where they won’t blow away or be attacked and shredded by your cat.
Tracing
We will be tracing pieces 1 and 2 onto a separate sheet of paper in order to keep the original pattern pieces in tact.
Method 1) I have used brown postal paper in the past because I like the larger size, but I actually have found it to be too thick. You can order brown paper online in all different weights, but I just haven’t wanted to front the money for that yet. In my studio, I have a table that I can actually pin into. (Thank you Dad, and brother-in-law!) I typically roughly cut out the pattern pieces, pin them on top of my paper using push pins or straight pins, then use my tracing wheel or pounce wheel to trace around the pattern pieces, including the darts. Afterward I use my pencil, straight ruler, and french curve to “connect the dots”.

Method 2) As it happens, we got hit with a blizzard in NC and I took most of these photos while working out of a hotel room where I was snowed-in. I took this an opportunity to trace my patterns in a different way that some of you might have easier access to. You will notice in this tutorial I am using a classroom sized “marker paper”. I carefully cut around the solid lines of my bodice front pattern piece, then used straight pins to actually pin them to my paper in a couple of places to keep it from shifting around. You could use pattern weights instead, or anything heavy you have around your house (i.e. tape dispenser, coffee mug). For the darts, I just cut into one leg and folded the paper over on the opposite line, forming the triangle cut-out that I could trace into without cutting up my pattern piece. I traced around the piece with pencil, but since my lines looked a little “wobbly”, I still went back through with a ruler to make the lines a little cleaner.
Cut out your piece, including the darts, and you are ready for Issue 3.


Happy Sewing!
-Stini

